The Walksnail Avatar HD Goggles X promises to be a game-changer in the realm of FPV goggles, boasting a long list of new features and improvements over its predecessor. In this in-depth review, we’ll explore the Goggles X’s design, functionality, and user experience. Whether you’re an experienced FPV pilot or a newbie seeking the best FPV gear, this article aims to provide you with a comprehensive understanding of what the Goggles X truly offers.
The review unit I received came with the following accessories. Do note, the production units might differ slightly:
(1) 4x omni-directional antennas (RP-SMA)
(2) Zipper carry case
(3) XT60 power cable
(4) Quick-start guide
(5) Lens cleaning cloth
Key Features
The new Walksnail Avatar Goggles X boasts a ton of impressive upgrades comparing to the V1. Here’s table comparing the official specs and features between the two goggles.
| Avatar Goggles V1 | Avatar Goggles X | |
|---|---|---|
| Screen Resolution | 1920x1080p | 1920x1080p 100FPS |
| Aspect Ratio | 16:9 | 16:9 |
| FOV (Diagonal) | 46° | 50° |
| Focus Adjustment | YES | YES |
| IPD Range | 57-70mm | 54-74mm |
| Input Voltage | 7V-21V (5S) | 7V-26V (6S) |
| HDMI Output | NO | YES |
| HDMI Input | NO | YES |
| USB-C Output | YES | NO |
| Canvas Mode | YES | YES |
| Sharing Mode | YES | YES |
| Race Mode | YES | YES |
| AV IN (Analog) | NO | YES |
| Modular VRX | NO | YES |
| Replaceable Lenses | NO | YES |
| Infrared Sensor | NO | YES |
| Built-in Gyro | NO | YES |
| Faceplate Foam | 1 | 2 |
| Bluetooth/WiFi | NO | YES |
Let me explain the enhanced features in a bit more detail:
(1) Screens now support 1080P at 100fps; the V1 Goggles does not support 100fps according to Walksnail
(2) The optical clarity has been doubled, FOV increased to 50° (Check here for FOV comparison)
(3) Input Voltage from 7V to 26V, supports 2S to 6S batteries
(4) Customizable LED colors on the front cover.
(5) Customizable front cover: You can swap it out for a patch antenna or an analog VRX module.
(6) HDMI In: Supports HDZero and can be used as computer display for simulators and movies)
(7) HDMI Out: Allows video feed played on external monitors
(8) AV In: Supports analog receiver modules and CVBS input.
(9) Focal length adjustment ranging from +2 to -6 diopter.
(10) IPD (Interpupillary Distance) adjustable between 54-74mm.
(11) Interchangeable lenses cater to astigmatism, myopia, and blue light protection needs.
(12) Built-in infrared sensor that turns off the screens automatically, extending OLED lifespan and battery life.
(13) Sharing mode (Audience Mode) available.
(14) Built-in gyro: As Walksnail suggests, this could pave the way for innovative applications like fixed-wing and RC vehicles, perhaps even head tracking.
(15) Modular VRX, allowing potential future upgrades.
(16) Integrated Bluetooth and Wi-Fi modules. As per Walksnail, they’re crafting an app for firmware updates, video sharing, drone location, and more.
(17) Two distinct faceplate foam paddings for diverse facial structures (but the review unit only comes with one).
Goggles X Specifications
(1) Screens: 1920×1080 100Hz OLED displays
(2) FOV: 50°
(3) IPD Adjustment Range: 54mm-74mm
(4) Focus Adjustment Range: +2.0 to -6.0 Diopter
(5) I/O Interface: HDMI Out/In (Mini HDMI), AV In (5Pin 3.5mm Audio Port), Power port (DC5.5*2.1mm), Micro SD Card Slot
(6) Communication Frequency: 5.725-5.850GHz
(7) Number of Channels: 8
(8) Transmission Resolution: 1080p100fps, 1080p60fps, 720p100fps, 720p60fps
(9) Bit Rate: Up to 50Mbps
(10) Minimum Latency: 22ms
(11) Transmission Distance: More than 4km (2.5 miles)
(12) Transmitter Power (EIRP): FCC: <30dBm, CE: <14dBm, SRRC: <20dBm, MIC: <25dBm
(13) Power Input: 7V-26V (compatible with 2S-6S Lipo/Li-ion Batteries)
(14) DVR Storage: Supports SD cards up to 256GB (not included)
(15) Connectivity: Integrated WiFi and Bluetooth
(16) Weight: 290g 315g
A Work in Progress?
When I began reviewing the Walksnail Avatar Goggles X, I had an extensive list of points to discuss. But I was constantly given new firmware to try as many of these issues seemed to had been addressed during my review.
This proactive approach to improvement is commendable. However, it also subtly hints that there might have been a rush to launch this product. But, on the brighter side, by the time you get your hands on these goggles, most significant issues should likely have been ironed out.
As I publish this blog post, a few minor concerns still remain, which I’ll go through in this review.
Design and Build Quality
First and foremost, let me address the elephant in the room – there’s no ON/OFF switch on the Avatar Goggles X! I get it; it might be a sore point for some. But remember, you can always power down the goggles by simply unplugging the battery :)
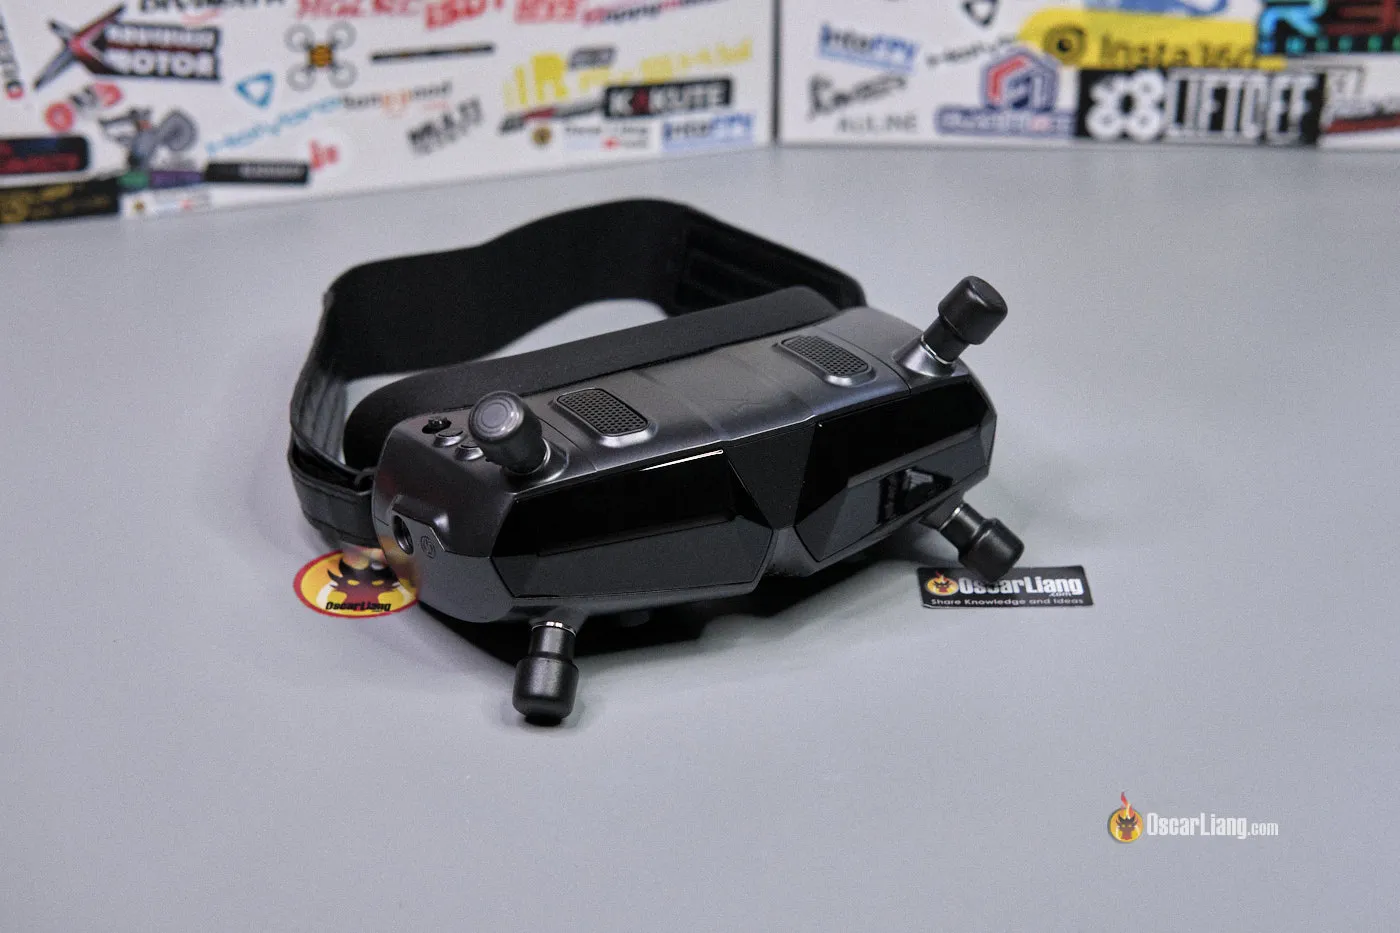
I must say, the new goggle design is refreshingly unique, diverging significantly from the Avatar goggles V1 and any other models I’ve come across. The Goggles X has a plastic housing with dark metallic paint finish that stands out.
Its form factor is similar to the Avatar V1 (and Fatshark Dominator HD) and the DJI Goggles 2/Integra.
The menu buttons are similar to the original goggles, but they are now better placed and more user-friendly, conveniently located on the top right.
A commendable upgrade is the introduction of the AV Input and HDMI input/output (Mini HDMI ports) located at the bottom. This means you can now use these goggles with analog through the AV IN and enjoy HDZero via the HDMI IN. You can use the goggles as an external monitor for your PC, to play movies or FPV simulators. You can also output video feed to an external monitor via the HDMI output.
Standard in premium FPV goggles today, the Goggles X offers both diopter focus and IPD adjustments. The adjustment dials, though a tad stiff, ensure you don’t accidentally knock them out of focus.
For me personally, the stock faceplate’s fitment and comfort have seen improvements since the original V1 goggles. While there’s a slight light leak around the nose, it’s negligible during flights, the silver lining is that it’s not pinching on my nose which feels more comfortable during those long flights. The foam pad on the faceplate is held on with velcro, which means possible aftermarket replacements.
It appears the foam padding for the DJI Goggles 2 also fit the Avatar Goggles X, it’s great because there’re already a bunch of choices available on the market.
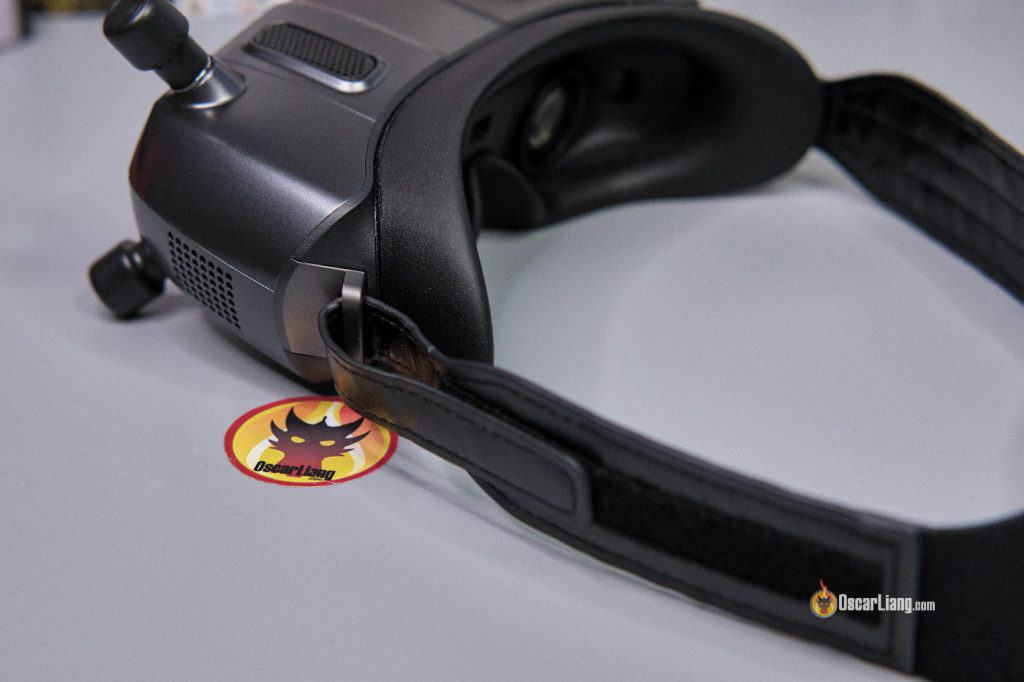
The fake leather head strap is attached with velcro, this makes it easy to adjust. You can even swap it out with a 3rd party strap. While I’d prefer it slightly wider, it’s sufficiently elastic and does the job.
User Experience
While some might prefer the aesthetics of the V1, others may lean towards the Goggles X. Aesthetics are highly subjective. However, when it comes to user experience and the range of features, the Goggles X stands as a clear and monumental upgrade without doubts.
For those familiar with the Walksnail system, transitioning to the new goggles is a breeze. The way it works is exactly the same as the old goggles.
The menu buttons, similar to the V1, include two push buttons and a 5-way joystick (5D button). Their placement is spot on, especially for the 5-way joystick, enhancing usability. On the V1, the joystick is placed at an angle, it was easy to press the wrong direction, I’m glad they fixed it in the Goggles X.
I didn’t notice any significant difference in RF performance compared to the goggles V1 when using the same set of antennas.
Walksnail boasts of “doubling the optical clarity” in their marketing material. However, during my tests, the image quality, color, and sharpness of the new Goggles X, felt similar to the V1. Here’s a side-by-side screen image comparison, these are actual images of the screen, taken with my iPhone. There might be some inconsistencies in exposure, detail and color due to my phone, but they look almost the same in my experience.
Possibly due to the slightly larger 50° FOV (field of view), I did observe a tiny bit of blurry edges and corners. I had similar issue with the DJI Goggles 2 for the same reason. I was hoping I could fix it by setting “Zoom Out” under Display to 90%, just like I did with the DJI Goggles 2, but this settings still doesn’t work like the previous goggles (screen doesn’t change).
Check here to compare Goggles FOV: https://oscarliang.com/js/fpvgogglefov.html
Walksnail hinted at the potential to swap lenses for astigmatism, myopia, and blue light-blocking glasses, but I’m still awaiting for official instructions on how to do it.
The user interface (in-goggle menu) looks identical to the previous goggles, with additional options specific to this new goggles in the Device page.
One minor gripe is how long it takes to get an image from boot-up. It took 35 seconds from the point you plug in the battery to getting an image from the quad. With the V1 Goggles, it only took 27 seconds.
DVR video recording: The file format is MP4, resolution is 1280x720p (depends on your transmission settings), bitrate is 50Mbps, basically identical to the previous goggles.
You can hear the anti-fog fan noise when wearing the goggles. Currently, there doesn’t appear to be an option to turn them off or adjust their speed. However, they seem to work in preventing the screens from fogging up so far, further testing is required in those summer days.
Enhanced Antennas Performance
The Avatar HD Goggles X came with some great stubby antennas!
For those who recall, the Avatar Goggles V1 were notorious for their subpar antennas, which led to disappointing performances.
However, with the Goggles X, the story is different. When I put these new antennas to the test, both on the old and new Avatar goggles, their performance was exceptional. Surprisingly, they even outperformed the DJI V1 Goggles antennas in terms of range and signal penetration.
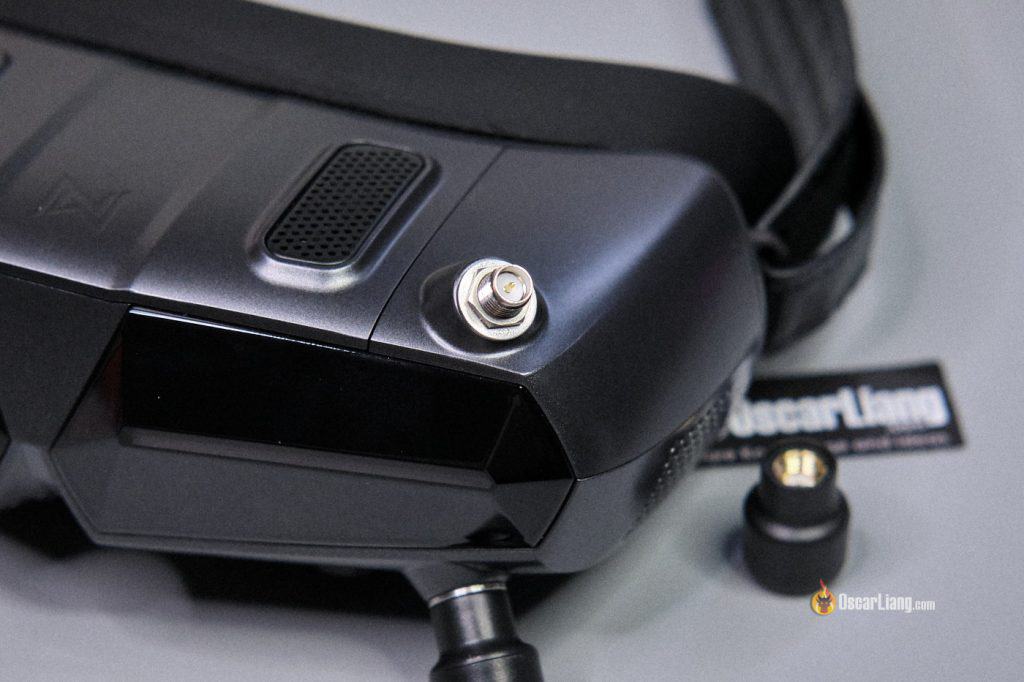
The Goggles X is equipped with four omni-directional antennas, and they’re all removable. The antenna connectors are RP-SMA (there’s no pin in the antenna), allow for easy upgrades to directional antennas if you’re seeking better range and penetration. For most people I think the stock antennas should be enough, but if you want you can check out my FPV antenna recommendations: https://oscarliang.com/best-fpv-antenna/
To use third-party antennas, don’t forget to remove the washers first.
Similar to the Goggles V1, out of the 4 antennas, 3 are receive-only antennas, while only 1 can receive and transmit simultaneously. If you ever want to use a patch antenna, ensure you attach it to the receive-and-transmit antenna connector.
This antenna is at a different location. While the Goggles V1’s receive-and-transmit antenna is located on the top right (with the goggles facing away), it’s on the top left on the Goggles X.
Proximity Sensor
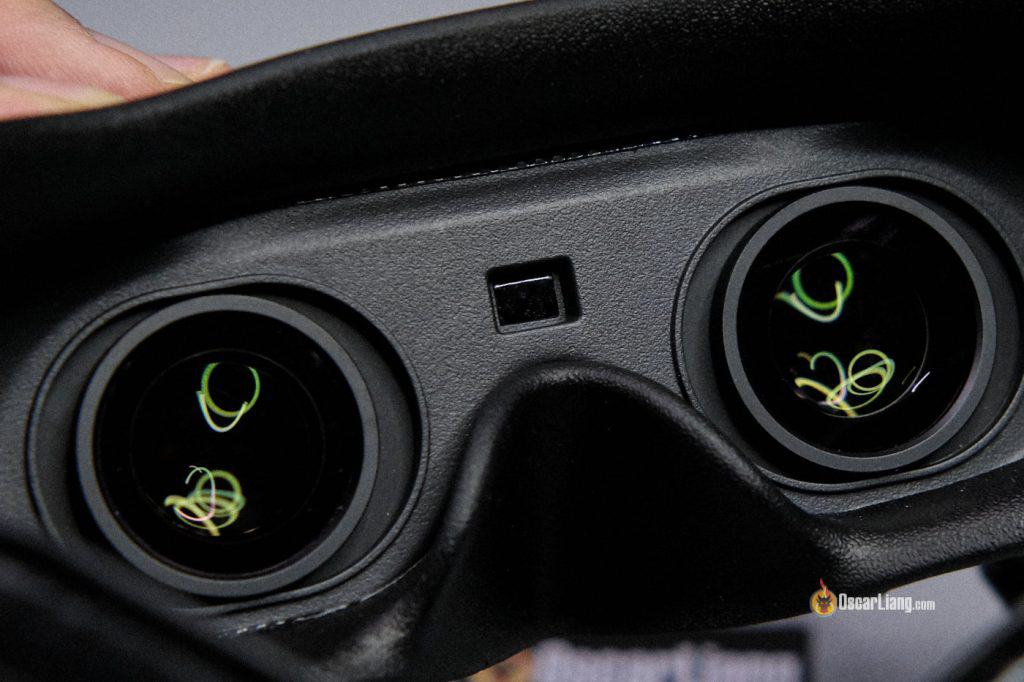
Between the lenses, there is an infrared sensor, which Walksnail refers to as Proximity Sensor. It’s there to detect whether the goggles are in use. If not, it will turn off the screens automatically. This thoughtful feature not only extends the OLED displays’ lifespan but also conserves battery.
However, the sensor’s sensitivity seems low. There were instances when the screens wouldn’t turn on despite me wearing the goggles. To activate the displays, I had to press the goggles firmly into my face. And the moment I let go, the screens switch off again. I hope there would be a way to calibrate the sensor in the future.
For the time being, I’ve disabled this feature (there’s an in-menu option). I’m not a big fan of this feature, because it can take a second or so to turn on the screens, which can be a little inconvenient and dangerous. Imagine this: you lift your goggles for a quick line-of-sight check on your quad/plane and then put them back on again, you could be flying blind for a brief moment. The DJI Goggles 2 has a similar feature, and they don’t even have the option to disable it. I simply put a piece of tape over the sensor to keep the screens on at all times.
Modular VRX Board Design
The Walksnail Avatar Goggles X features a modular design, allowing users to replace the VRX board. But why should this matter to you?
According to my contact at Walksnail, they are in the midst of developing a new digital system that is said to offer five times the range—extending potential distances up to 20km compared to the current system’s 4km. Expected to launch by next August, the Goggles X will be able to support this new system with a swap of the VRX board. This upgradability ensures the Goggles X will not become obsolete if Walksnail releases a new system.
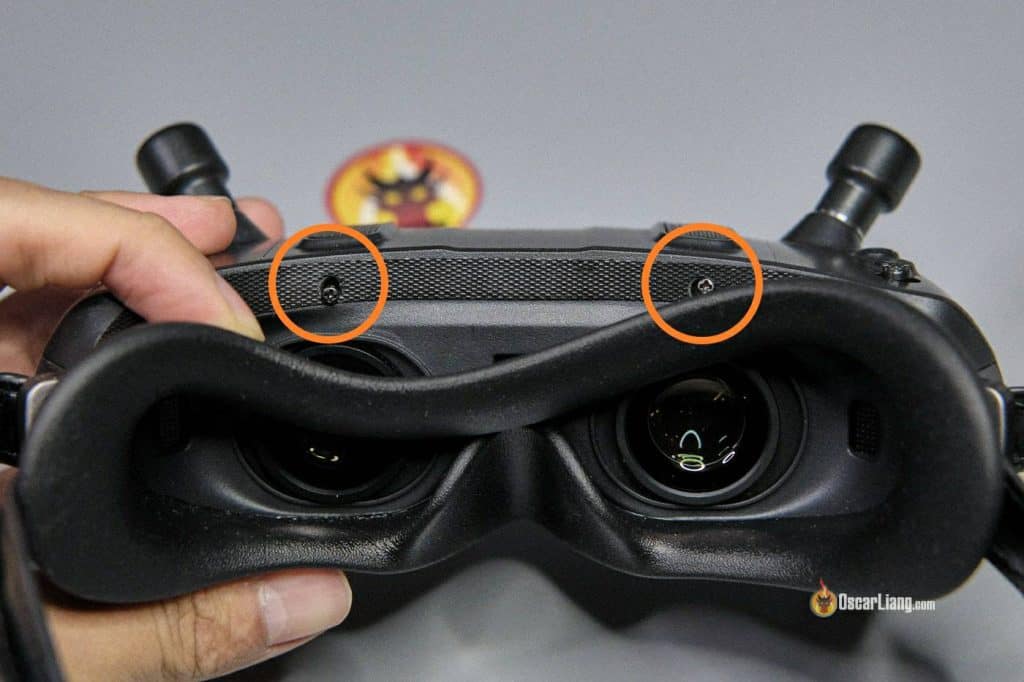
To access the VRX board, start by removing the two screws located on the top of the faceplate.
Then remove the top cover, reveals the VRX board which is secured by 4 screws. Additionally, you’ll notice the Bluetooth/WiFi antenna taped to the inside of this top cover.
Customizable Front Cover
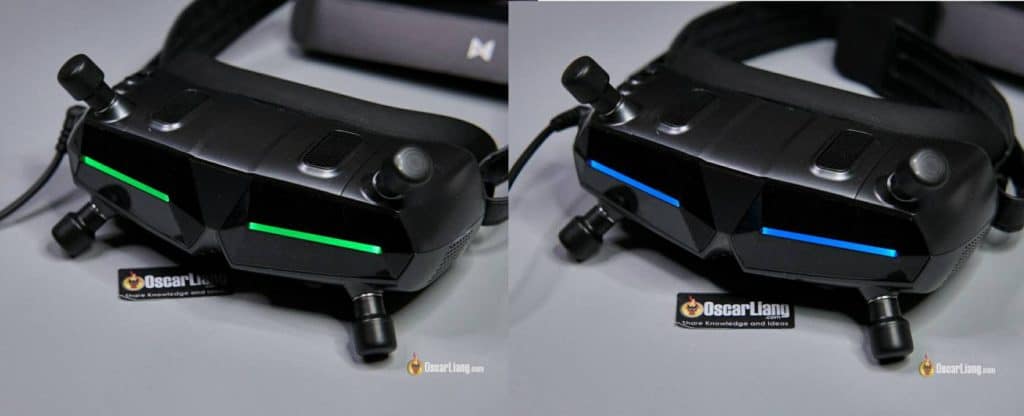
The front cover of the Goggles X features multi-color LED bars – a unique design in FPV goggles. You can set them to 3 different colors: red, green or blue, or just leave them turned off (there’s an option in the menu). These not only add a flair of personalization but also serve a practical purpose. By illuminating the LEDs, you get a visible reminder if your goggles are left powered on, whether they’re resting on a bench or lying on the ground.
This front cover can be removed, allowing for the installation of an adapter for an HDZero VRX module, or an analog receiver (possibly something similar to the BDI Digidapter).
Walksnail offers a patch antenna to replace the front cover which you can purchase here: https://oscarliang.com/product-wikh
Power Consumption
The Walksnail Avatar Goggles X handled power from 2S up to 6S batteries correctly as expected. The power consumption averages around 8.3W. Here are the current draws at various input voltages (consistent in different RF power levels):
(1) 1.06A at 8V
(2) 0.52A at 16V
(3) 0.35A at 25V
Compared to its predecessor, the Goggles X seem to be more power-hungry, use about 30% more power. The V1 consumed around 6.4W (for instance, 0.8A at 8V or 0.4A at 16V). However, one notable distinction is the voltage support. While the previous model could handle up to 21V, the Goggles X supports up to 26V. This means you can just pick up any 6S drone battery to power the Goggles X without ever worry about damaging your goggles because voltage is too high.
(1) A 6S 1000mAh LiPo, or a 4S 1500mAh LiPo would last around two and a half hours.
(2) A 4S 3000mAh Li-ion battery would last around 5 hours.
Input Voltage Testing
The Goggles X appears to overestimate input voltage by 0.2V. While the error is so small and shouldn’t cause any issue, it would be nice if there’s a way to calibrate it.
The Goggles X intelligently identify the number of battery cells based on the initial input voltage. As the voltage drops below a certain level, sets off a low voltage alarm—typically around the 3.5V-per-cell mark.
I tested the goggles using a bench power supply with variable voltage, starting from 26V and worked my way down. Here’s a breakdown of my findings:
(1) At 21.0V: Constant beeping – this is the low voltage alarm for 6S.
(2) At 18.8V: The beeping stops.
(3) At 13.9V: The low voltage alarm for 4S is triggered.
(4) At 13.0V: Beeping stops.
(5) At 10.4V: The low voltage alarm for 3S is triggered.
(6) At 9.2V: The beeping stops.
(7) At 7.0V: The low voltage alarm.
(8) At 10.4V: The low voltage alarm for 2S is triggered.
(9) At 5.6V: The beeping stops.
(10) At 5.2V: The goggles shuts down. The screens go black, but the fan is still running.
Having a low voltage alarm at 3.5V per cell is ideal for LiPo batteries. However, for Li-ion it’s too high and there’s potentially 40% capacity left. Li-ion cells can typically be discharged down to 3.0V or even lower, having an option to change low voltage alarm would be a welcomed addition.
Interestingly, the goggles remain functional even below their stated lowest input of 7V. But it’s worth noting that I’m uncertain if RF performance is impacted at such low voltage. For safety and optimal performance, it’s best to follow the recommended voltage inputs and avoid powering your goggles below 7V.
Finally, the goggles seemed to skip the low voltage alert for 5S. Considering these findings, it might be wise to avoid using 2S and 5S batteries to power these goggles. 3S, 4S and 6S are all good choices.
Analog Support (AV IN)
One of the biggest complaints of the original Avatar Goggles was the lack of support for analog FPV system. Finally Walksnail has added an AV input in the new Goggles X, and analog support is now possible. The AV IN port is a 5-Pin 3.5mm Audio Port. I tested it with the BDI Digidapter from the DJI V1 Goggles, and it worked flawlessly.
To switch to AV mode, you have to long press the return button. This toggles you through the available video modes: AV IN, HDMI IN, and Walksnail’s native mode.
One advantage here is the signal behavior. When you lose signal, the Goggles X displays static just like a typical analog goggles. This contrasts with the DJI V1 Goggles, which would revert to its logo display, and be stuck there for an extended period. This “static screen” in the Goggles X allows pilots to immediately regain video feed as soon as signal is back.
However, in AV mode, it defaults to 4:3 aspect ratio, with no option to switch to the wider 16:9. Hopefully this can be added in the future.
To use analog receivers, anticipate a need for a custom mount/adapter. It’s currently unknown whether Walksnail will provide such accessories, or the FPV community will have to take on the task of creating custom solutions.
Beware that at the time of writing, DVR doesn’t work on the AV input or the HDMI input, it only works on the Walksnail Avatar mode. Pressing the record button does nothing in AV in and HDMI in modes. That means there’s no DVR for analog, and you would have to use an external device for that. Unfortunately this is a hardware limitation and this feature might not be available any time soon as far as I know.
HDMI IN
The Goggles X worked fine as an external display for my computer via the HDMI Input port. It appeared as a 1920x1080p display, and I could watch movies and play FPV simulators. However, there’s a design hiccup: the HDMI input port is recessed too deep into the goggle’s housing. This design choice means that some cables might be incompatible due to an inability to fully engage upon insertion.
Moreover, while the goggles are compatible with the HDZero VRX module, to achieve a streamlined setup will require a custom-made mount, which again, is currently unavailable. The stock Mini HDMI cable from HDZero doesn’t work either. It does not insert fully into the HDMI port on the goggles for the reason mentioned above, so you’d have to get another cable with a longer connector.
HDMI Out
Video output is now done via the HDMI out port. Note that it doesn’t support 1080p 100fps (high frame rate), you have to lower it to 60fps (standard frame rate)
Other Minor Concerns
Apart from the highlighted issues, there are a few more quirks worth noting:
1. The actual range of IPD (Interpupillary Distance) adjustment turned out to be narrower than expected when I measured it using a calibre. My measurements suggest a range of around 58mm to 70mm (+/- 1mm), which is similar to the Avatar Goggles V1.
2. The absence of a USB-C port could be a drawback for some. For video output, an external display must be used via HDMI. A USB-C port would have been convenient for video output to an Android smartphone.
3. The maximum screen brightness of the Goggles X seems to be about 80% of its predecessor. I’ve raised the issue with Caddx and waiting for a reply, it remains to be seen if this is a hardware limitation or software related. I don’t think this is a huge problem because I personally never use maximum brightness anyway, as it actually hurts my eyes. Even under direct sunlight I normally find setting brightness to around 4 more than enough with the original Avatar Goggles, so for the new Goggles X, that would be around 6.
Conclusion: Should You Buy the Avatar HD Goggles X?
Once, the HDZero Goggles were hailed as the most versatile FPV Goggles, supporting all FPV systems except DJI. Now, the Avatar Goggles X is competing for that title, with support for Walksnail, analog, and even HDZero, all at a lower price!
This raises the question: Which goggles are right for you?
If you already own the original Avatar Goggles V1, an upgrade might not be immediately necessary. That’s because the image quality and RF performance are largely similar between the two, unless the analog and HDZero compatibility is important to you, you might want to just hold on to your V1 until they drop the promised new system.
However, for those new to Walksnail, the Goggles X presents a compelling option. Priced at just $459, which is lower than the flagship goggles from all other competitors including DJI, HDZero, Fatshark, Orqa and Skyzone, the Avatar Goggles X delivers the best Walksnail experience hands down.
If you have been only using the Walksnail External VRX module, now might be a good time to upgrade to the Goggles X to get the most out of this system.
How to Get Started?
Using the Avatar Goggles X is the same as other Walksnail goggles. If you need a detailed walkthrough, my setup guide is available: https://oscarliang.com/setup-avatar-fpv-system/
Goggles X Beeping Indications
(1) Link State: DI… DI… DI… DI…
(2) Firmware Upgrade: DI……. DI……. DI……. DI…….
(3) Upgrade Failed (due to missing SD card or firmware): DI DI DI DI
(4) Boot Failure (Reboot or firmware update required): DI.. DI…… DI.. DI……
Enabling FCC Mode
Out of the box, the Goggles X might be in CE mode, meaning fewer channels are available and it’s limited to 25mW RF power. Switching to FCC mode unlocks all the channels (8 channels) and RF power levels (up to 1200mW), but do this if it’s legal where you are. Here’s how to do it: https://oscarliang.com/setup-avatar-fpv-system/#Unlocking-FCC-Mode
How to Link VTX to Goggles
1. Power on the VTX, wait until the green LED is flashing slowly.
2. Power on the Goggles, wait until you are in the home screen.
3. Press the link buttons on both devices. The VTX LED should turn solid red, and the goggles should start beeping. It should only take a few seconds to pair.
4. Once paired, the VTX LED should turn solid green, the Goggles should stop beeping, and you should get an image in the goggles from the drone’s camera.
How to Upgrade Goggles Firmware
Follow the instructions here carefully for a smooth upgrade: https://oscarliang.com/setup-avatar-fpv-system/#How-to-Update-Firmware-on-GogglesVRX
Here’s the summary:
(1) Download the upgrade firmware with a file name like this: AvatarX_Gnd_X.X.X.img (X.X.X is the version number). Copy it to the root directory of the SD card. Make sure NOT to change the file name.
(2) Insert SD card back in the goggles, and plug in the battery to power them on.
(3) When you see the home screen, press and hold the link button on the Goggles for 8 seconds, and the Goggles should automatically restart and start beeping. (Do not power off during the upgrade.
(4) The firmware update can take around 5 to 10 minutes, when complete, the beeping should stop and the goggles will reboot.
Article Source:oscarliang.com












Leave a comment
All comments are moderated before being published.
This site is protected by hCaptcha and the hCaptcha Privacy Policy and Terms of Service apply.